Spring is here and with it come two ages-old symbols of fertility – the rabbit and the egg. But since Easter comes in the springtime, these symbols are part of the Christian tradition of Easter. Either way, they’re cute and so I decided to make a LEGO bunny and some eggs.
Category: Themes
LEGO Themes
Desktop LEGO: Easter Bunny and Trees
I won this bulk bricks box (#6177 Builders of Tomorrow) at the annual BayLUG raffle, and took it to work, where I built a couple things: Easter Bunny with two eggs, and a couple trees (not to scale).
Sheep
The February BayLUG meeting had an “animals” contest theme, so I put this together the night before. Like the Xmas Ornaments I posted about a couple months ago, it’s basically an elongated Lowell sphere, with head and legs attached and an ice cream tail.
Happy St. Patrick’s Day
March 17th is St. Patrick’s Day, the day when just about everyone in the U.S. claims to be at least a little bit Irish, which means wearing green clothing and often imbibing copious amounts of beer with green food coloring added, especially when it falls on a weekend. (There’s very little to do with saints involved.) And more to the point, images of leprechauns. Continue reading “Happy St. Patrick’s Day”
Xmas Ornaments
This year I built a set of Christmas ornaments that I gave to someone special as a gift. I haven’t posted a MOC (My Own Creation) in a while, so I thought I’d share them with you all too. Continue reading “Xmas Ornaments”
Octan Gas Station
My LEGO gas station is now on display at the LEGO store in Pleasanton, California at the Stoneridge Mall. I built it in 2012 and first showed it at Bricks by the Bay, but never posted a blog entry about it until now. Continue reading “Octan Gas Station”
The Frustrating World of LEGO Trains
The world of LEGO trains can be rather frustrating for the adult hobbyist. Here’s a quick primer for those who are interested in getting into this part of the LEGO hobby. (This is adapted from a comment I made on Facebook in response to someone who was just getting into LEGO trains in 2014.)
LEGO and My Mom
For Christmas this year, my mom got me a sweater, a necktie, a pocketknife, a toothpaste tube squeezer, and a LEGO set – LEGO Train Set #3677 Red Cargo Train. I went over to her house last night and we exchanged gifts, and she wanted to see what it looked like when it was built…. so I suggested we build it right then and there! To my surprise she wanted to do it, so I helped by sorting out the parts and going through the instruction book with her while she put the pieces on. Her 71 27 year old fingers had some trouble getting the pieces to go on, but it went pretty well.
This was, I honestly think, the first time we ever did this! I think maybe one time as a kid I tried to work with her but I didn’t have the patience and took it away to do it myself. At least, that’s the sort of kid I was :-) but we went through the first two of seven bags (the locomotive, and the high-rail truck) and she built them all herself. But after that, her fingers were sore and it was like 11pm, so we stopped and I took the rest home.
But it was really a nice little mother/son moment, even if it was 30 years late.
Rainbow Connection
My latest creation is a life size model of Kermit The Frog with his banjo, as seen in the opening scene of the 1979 film The Muppet Movie, when he was playing “Rainbow Connection.” I haven’t done a photo shoot of the model on its own, so for now you will have to be satisfied with pictures from Bricks by the Bay 2012. I will update this post when I have more pictures to add. I was very pleased to have this model voted “Supreme Sculptor” (best sculpture) and “Greenest” (best use of the “Green” theme for the convention).


I built the head first and showed it at the February BayLUG meeting. There was a building contest with a theme of “Movies” based on the fact that the Academy Awards were held near the time of the meeting, and I won the adult competition with the head alone. But for Bricks by the Bay I wanted to at least do a bust if not the whole body. My dream was to have a log made of LEGO bricks for him to sit on, based on the scene in the movie, and I may yet do that….
Kermit’s head started with his eyes. When the new movie The Muppets was in the “coming soon” phase, and I kept seeing ads for it, I started thinking about how a partial Lowell sphere would be a good way to model his eyes, and thought about how a 2×2 round tile can be mounted centered on a 1×4 plate (If you haven’t seen this before, try it! The 2×2 round tile is one of the most versatile pieces LEGO makes.) To make the shape of his head come out right, I had to mount the eyes at an angle, which is done by some interior clips, and then build up LEGO slopes to try to make it fit in as seamlessly as possible. There are even some 1×1 “Henrik” (cheese) slopes that are sandwiched in between parts but not actually attached to anything, just to fill in the gaps!
This part used a huge number of green slopes. I quickly ran out and had to buy more from club members and BrickLink to complete the model. Thanks to Paul Sinasohn, Jayson Cabuag, and Pete Woulfe for helping me to get the parts in a timely manner. I bought parts from Paul at the February BayLUG meeting, and the Monday before the convention, I made a trip up to San Francisco and picked up some more from Pete, and then (after a brief detour to do some dancing at Shades of Blues) took a trip to San Jose to pick up my BrickLink order from Jayson. The lime wedge plates that make up his collar, and more of the green slopes, were mostly from various BrickLink sellers over the course of February and early March, and I choose not to contemplate how much I had to spend to get those…

A week before the convention, all I had was his head and collar. The rest of the body, arms, and legs, were built during those few days before the convention. The body is pretty straightforward construction, but the arms and legs were trickier. I used the Technic click hinge joints to articulate them, and though they aren’t strong enough to hold up the arms and legs in a pose, they do allow the range of movement needed (well almost – his hands don’t quite reach where the strings on the banjo should be). The arms and legs are octagonal in cross-section, but because inverse slopes in green are much less common, I built them by constructing each segment studs-out and then mounting them together back-to-back using various methods. The hands and feet are simple assemblages of green plates. I wish I could have made the fingers articulate but I didn’t have the parts in green to do that.
But by far my favorite part of this model is the banjo, and that was done in a day from parts I had on hand. I made the circle out of 1×2 log bricks interspersed with 1×1 round bricks, with a wall of white 1x bricks to form the face of the banjo. The neck and other details came together out of basic bricks and plates in a straightforward manner. The round part of a banjo is basically a drum, and so there are tightening screws all the way around it to adjust the tension. I simulated those using grey LEGO bars mounted on clip plates, and think it comes off looking quite realistic. I did not string the banjo, because I was afraid I wouldn’t be able to get the strings taut enough to look right. I might see if I can add strings to improve it later though.
I used the head of Kermit as a demonstration model in the SNOT (Studs Not On Top) panel at Bricks by the Bay, and plan to post some more detailed pictures of the construction techniques used in the future, so watch this space.
If you missed Bricks by the Bay, I plan to bring Kermit to the Bricks Cascade convention in Portland in June, so look for him there.
All the photos of Kermit are in the Rainbow Connection photoset on Flickr (click any of the photos in this post, or view as slideshow).
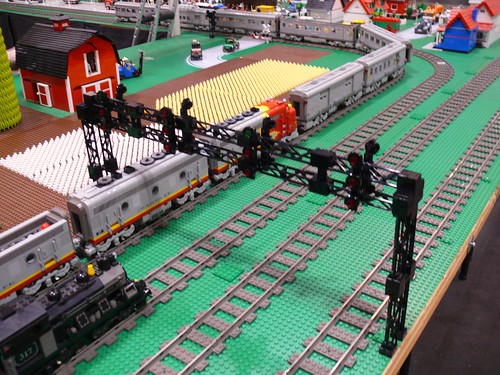
Four-Track Signal Gantry
A signal gantry I built over four tracks at Bay Area LEGO Train Club exhibit at the Train Collectors’ Association Cal-Stewart Spring Meet, Santa Clara, California, March 2-4, 2012. I built it Friday night after we finished the setup when I realized we would have a four track line without much decoration in that area.
The signals over each track are based on the Union Pacific Signal Rules. Over each track there is a signal facing each direction, and each signal has three lights which could be red or green. I set up the signals with two each track marked “Clear” in one direction (top light green, two lights below red), and “Stop” in the other direction (all three lights red), in keeping with the direction of travel we used on the layout, but after I set all that up, someone put trains on running in the opposite direction (as shown in the photo below)!