Four-Track Signal Gantry

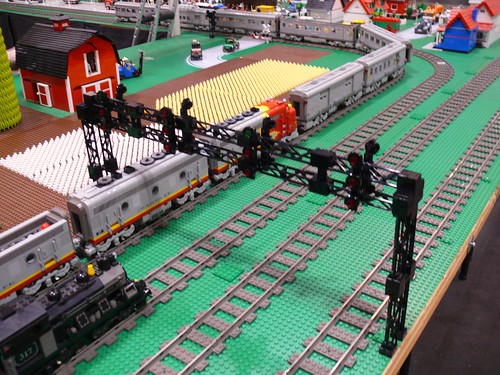
A signal gantry I built over four tracks at Bay Area LEGO Train Club exhibit at the Train Collectors’ Association Cal-Stewart Spring Meet, Santa Clara, California, March 2-4, 2012. I built it Friday night after we finished the setup when I realized we would have a four track line without much decoration in that area.

The signals over each track are based on the Union Pacific Signal Rules. Over each track there is a signal facing each direction, and each signal has three lights which could be red or green. I set up the signals with two each track marked “Clear” in one direction (top light green, two lights below red), and “Stop” in the other direction (all three lights red), in keeping with the direction of travel we used on the layout, but after I set all that up, someone put trains on running in the opposite direction (as shown in the photo below)!

Four-Track Signal Gantry

City Park

At train shows, we (the Bay Area LEGO Train Club) have developed a standard city block system, where our downtown area is divided up into blocks that are 2 by 3 32 x 32 baseplates in size (i.e., 96 x 64 studs). For some time now I’ve shown my Blackburn Hotel and its accompanying city block (but I have never done a proper photo shoot of those buildings either, I just realized) at various shows and conventions and you have probably seen that featured here a few times.

For Bricks by the Bay and the upcoming National Train Show in Sacramento, I’ve built a second city block. But instead of tall buildings, it just features a city park. Each of the six baseplates has its own feature:

  • Tree and picnic/grassy area
  • Playground with swingset, slide, merry-go-round, and carousel
  • Life size (for minifigs) chess set
  • Flower garden
  • Basketball court
  • Tennis court

In addition, there is a fountain in the center and various tile mosaics and other decorative aspects. The whole thing is surrounded by a wrought-iron fence with gates on each of the four sides.

I haven’t done a proper photo shoot of the park yet, but I did take detailed pictures of it at the most recent BayLUG meeting. I hope to take better pictures soon, but for now, take a look at these (click the image to view the set, or click here to view a slideshow)

Shasta Teardrop Travel Trailer

My latest vehicle MOC is a camping trailer, based on the 1960’s Shasta travel trailer. Click the image to view the set on Flickr, or check out the slideshow.

Shasta travel trailer

I built it for the campground scene that Loren built for BayLUG’s exhibit at the Museum of American History in Palo Alto. The display will be open to the public through January 11, 2009, on Fridays through Sundays. If you’re in the local area, come on and check it out one of these weekends.

I had made two RV’s before this, a Class C motorhome and a “toy hauler” fifth wheel trailer. But since I didn’t think Loren’s campground would work with just two campsites filled, I got inspired to make another. I built it to be compatible with the “Range Rover” from the new 7635 Horse Trailer set, partly because I didn’t want to also have to build a tow vehicle, and partly because I really like the look of that car.

As for the trailer design, I wanted to build something iconic, and thought about doing an Airstream but the curves were too complex. I thought of the “teardrop” trailers, since they have flat straight sides. I did some image searches online and found a few images of the Shasta trailer, and decided to build that:

Daisy Tin can tourist Shasta Bay

Isuzu NPR Delivery Truck

My latest model is one of the most common trucks in the world today, the Isuzu NPR.

Isuzu NPR Delivery Truck

This one is configured as a delivery van, with roll-up door in the rear. Notable details include the cab with sloped windshield, fuel tank, sloped driveshaft, mud flaps, and 6 wheels.

I originally had the idea for this at one of the BayLUG meetings in conversation with another member, Brooks. He and I experimented with the geometry to see if the windshield design was doable at that meeting, and after many iterations this is what I ended up with.

Wheeled School Bus

Hot on the heels of my fantastical Lunar School Bus, here’s a much more mundane version.

Wheeled School Bus

This is the first time I’ve ever encountered a need to specify “wheeled” with reference to a school bus – how about you? :-)

Anyway, it wasn’t that hard. I was thinking of doing it anyway, but when Flickr user Mad physicist asked about it I decided to give it a whirl. I pulled off the antigravity bottom and rocket engines, and otherwise left it intact. The hardest part was the nose, because it contains SNOT sub-units facing in several different directions (up, forward, down, and to both sides), plus half-stud offsets here and there to keep things interesting. However I found a way to reuse as much of the original as possible.

I was also asked if I could make instructions for it. Well, I have done that too. I made a CAD version of the lunar school bus first before I started tearing anything apart (just in case!) and then later adapted it so that you could build either school bus from the same set of sub-units. I have a master MPD file containing everything needed to build both versions, and thanks to the MPD Wizard from Orion Pobursky (see the LUGNET thread where I heard about it for details), I also have separate MPD files containing just what you need to build one or the other. I’m not sure yet how I’m going to publish it – should I charge money or just give it freely? Would people be happy with the MPD file or would they want proper directions?

Anyway, click the pic for the rest of the photos, or view a slideshow. I included some interior shots from the lunar bus in the photoset because the interior is identical.

Modular 16×32 Buildings

These two buildings, both built on 16×32 stud baseplates, have been featured in many BayLTC displays over the past couple of years. They were built in a modular fashion so that floors can be mixed and matched if desired, and taken apart for more compact storage and transport.

Red BuildingBlue Building

The blue building has a removable module for the two upper floors, and another one for the roof. The red building has one removable module, consisting of the upper floor plus roof. The Blackburn Hotel was built according to the same standards.

The trouble with this modular design though is that the architectural style of the different buildings clashes too much; they would never be combined in real life.

These buildings have now been disassembled, largely because I feel that 16×32 is just too small of a footprint for a realistic building. I am now working on new buildings using a 32×32 or larger size footprint. I brought the works-in-progress for this project to the October BayLUG meeting.

Click one of the big pictures to go to the set page on Flickr, or view a slideshow of the photos.

Blackburn Hotel

The Blackburn Hotel is a building that I have displayed may times as a part of the Bay Area LEGO Train Club layouts at train shows and meetings, but never blogged about.

Blackburn Hotel

It is one of several 16×32 footprint downtown buildings which I created for the layout one time a few years ago when I heard that several of the members who usually bring buildings to train shows weren’t going to be participating in one of the shows, and we desperately needed downtown buildings.

The building is five stories tall, built mostly using black bricks with tan trim and red windows. The unique feature of the hotel is the signs: a rooftop “BLACKBURN HOTEL” sign and a vertical sign that says “HOTEL” which is intended to be placed at a street corner, but can be rotated 45 degrees to be used for a mid-block placement.

The name was suggested by my wife. Partly it is due to the color, and partly due to the fact that I was watching an English Premier League football (soccer) match on TV as I was building it featuring Blackburn Rovers (I support any team that has American players, and Blackburn have an American goalkeeper, Brad Friedl, as well as the New Zealander Ryan Nelson who used to play in Major League Soccer).

Click the big picture to go to the set page on Flickr, or you can view a slideshow of the photos.

Little House Instructions

Recently I posted about some little houses that I had built for the BayLTC train shows. The photos for that are on Flickr, but I wanted to also publish them on Brickshelf which I now have done.

In addition, you can find LDraw instructions for each of the three houses should you be interested in building them yourself. Here are direct links to the building instructions:

Each one is published under a Creative Commons Attribution-Share Alike 3.0 United States License so you are basically free to do whatever you want with it as long as you give me credit. Enjoy!