
I won this bulk bricks box (#6177 Builders of Tomorrow) at the annual BayLUG raffle, and took it to work, where I built a couple things: Easter Bunny with two eggs, and a couple trees (not to scale).
Tag: moc
Octan Gas Station
My LEGO gas station is now on display at the LEGO store in Pleasanton, California at the Stoneridge Mall. I built it in 2012 and first showed it at Bricks by the Bay, but never posted a blog entry about it until now. Continue reading “Octan Gas Station”
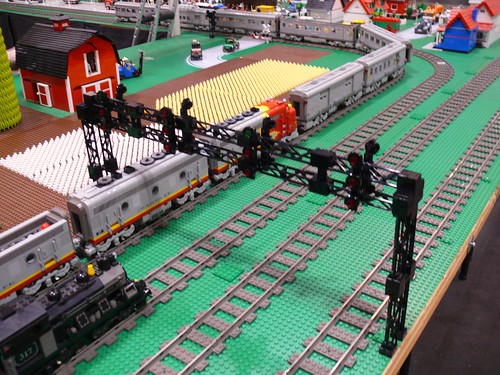
Four-Track Signal Gantry
A signal gantry I built over four tracks at Bay Area LEGO Train Club exhibit at the Train Collectors’ Association Cal-Stewart Spring Meet, Santa Clara, California, March 2-4, 2012. I built it Friday night after we finished the setup when I realized we would have a four track line without much decoration in that area.
The signals over each track are based on the Union Pacific Signal Rules. Over each track there is a signal facing each direction, and each signal has three lights which could be red or green. I set up the signals with two each track marked “Clear” in one direction (top light green, two lights below red), and “Stop” in the other direction (all three lights red), in keeping with the direction of travel we used on the layout, but after I set all that up, someone put trains on running in the opposite direction (as shown in the photo below)!
Gondola Car II
When I first saw the new bracket parts found in the LEGO Tipper Truck #4434, I realized I needed to use them to make a train car.
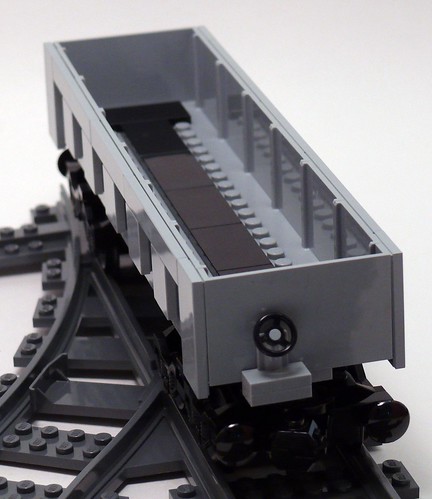
I used parts from 2 of those sets to make this, along with a few parts I had laying about from other sets I’d recently taken apart (mostly the Maersk Train 10219). It was a very simple build – the main part is just two of the tipper parts from the Tipper Truck set with just a few tiles rearranged. The undercarriage is just made of plain grey plates, and the wheel trucks are quite simple.
In 2008, I designed another Gondola car, using 1x2x2 panels with 1×1 bricks between for the sides. This was so much simpler, and arguably more realistic (thinner walls), though the older model has more details on the ends. Instructions for that older model are available, but the new part isn’t in LDraw yet so I can’t make them for this one for a while.
Gondola
This is my first ever train car MOC, would you believe?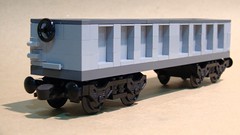 I’d done locomotives before, but never a car, at least that I can think of…
This gondola car first appeared at the November 2008 Great Train Expo layout by the Bay Area LEGO Train Club. I made two of these cars with a cargo of coal.
One end has a brake wheel; the other does not. Originally I built it with brake wheels on both ends but was told that was not correct, so I removed it from one end.
Wheeled School Bus
Hot on the heels of my fantastical Lunar School Bus, here’s a much more mundane version.
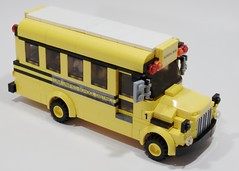
This is the first time I’ve ever encountered a need to specify “wheeled” with reference to a school bus – how about you? :-)
Anyway, it wasn’t that hard. I was thinking of doing it anyway, but when Flickr user Mad physicist asked about it I decided to give it a whirl. I pulled off the antigravity bottom and rocket engines, and otherwise left it intact. The hardest part was the nose, because it contains SNOT sub-units facing in several different directions (up, forward, down, and to both sides), plus half-stud offsets here and there to keep things interesting. However I found a way to reuse as much of the original as possible.
I was also asked if I could make instructions for it. Well, I have done that too. I made a CAD version of the lunar school bus first before I started tearing anything apart (just in case!) and then later adapted it so that you could build either school bus from the same set of sub-units. I have a master MPD file containing everything needed to build both versions, and thanks to the MPD Wizard from Orion Pobursky (see the LUGNET thread where I heard about it for details), I also have separate MPD files containing just what you need to build one or the other. I’m not sure yet how I’m going to publish it – should I charge money or just give it freely? Would people be happy with the MPD file or would they want proper directions?
Anyway, click the pic for the rest of the photos, or view a slideshow. I included some interior shots from the lunar bus in the photoset because the interior is identical.
Lunar School Bus
The other day I was thinking I’d build another hovercar, like my 2059 Cadillac or my remake of Justin’s red aircar. 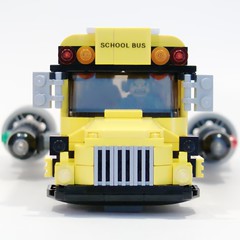 But as I was sifting through a bin of curved parts, the idea came to me to build a school bus when I saw some yellow Brick 2 x 4 x 1 & 1/3 with Curved Top (6081) parts.
I built it 7-wide (not counting the rocket engines), thanks to an idea I got from Flickr users Lego Monster and Mad physicist since it leaves room for an aisle; see their bus for the inspiration.
I also detailed the interior, with several students in varying degrees of good behavior and a driver inspired by the one from South Park. There are two thugs in the rear who are either conspiring or fighting, maybe both. There’s a boy facing backwards, harassing the girl in the seat behind him. And then in the front there are two reasonably well behaved kids whose hands are raised to report all this bad behavior to the driver. (Well really, their hands are raised because otherwise they wouldn’t fit in their seats)
The bus is a hovercar, using the same kind of smooth underside that I used on the Cadillac and red aircar with the ‘Wedge 4 x 4 x 2/3 Curved’ (45677) and/or ‘Wedge 4 x 6 x 2/3 Curved’ (52031) parts on the underside to represent antigravity units. I also added some 1950’s sci-fi style rocket engines for those longer hops between lunar settlements.
To see more, click the picture above or view the set on Flickr (or as a slideshow).
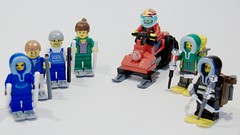
Snow Sports Minifigs
Sushi Bar
My latest building is a sushi bar.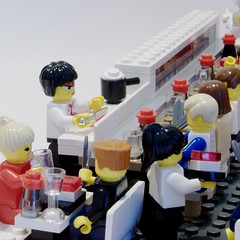 It is part vignette and part town building.
I built the interior first, starting with a bare baseplate. Only when that was completely finished, I built a basic box for walls with windows and a door in front, and a back door in the rear. The box lifts off easily; the perimeter of the baseplate is tiled, with only one stud on each side (a jumper plate) holding the walls in place.
On top of the walls there is a simple roof, with 6×8 slopes for an overhang and homemade signs, made with my trusty P-touch label maker. (The name of the restaurant is Hoshi Sushi; hoshi means “star” which is because I found that my label maker could make stars….)
The restaurant is staffed by two people: a sushi chef and a waitress. Both are rather overworked, as it is a prosperous enterprise. It was inspired by and loosely based on my favorite local sushi place, Masa’s Sushi in Mountain View, CA.
Some things to look for:
- Chopsticks made from (Minifig Feathers with Pin)
 stolen off the roof of my 10185 Green Grocer set. See them clearly here.
 - The overpreponderance of maguro nigiri (tuna over rice) on people’s plates. This is because the only transparent color I have in 1×1 tiles that looks at all like raw fish is trans-red. I wish I had some trans-orange 1×1’s so I could have sake nigiri (salmon) but alas, no. I have some 1×2’s in trans-orange in the sushi bar waiting to be cut, however. I also have some people eating (non-trans) brown, which I decided is unagi nigiri (eel). None of the other 1×1 tile colors looked at all appetizing, and I couldn’t figure out a way to make maki (rolled) sushi at all at this scale…
- Soy sauce bottles – some are full, others are empty. (I ran out of trans-smoke cones)
- The slightly-too-big-for-minifig-scale maneki neko (beckoning cat) which sits in the back left corner (the prosperity corner, according to Feng Shui traditions) to attract money. Masa’s has a maneki neko in that spot too, but instead of a gold coin, it’s holding a bottle of Asahi beer. I guess Masa wants to invite more beer into his life :)
- See if you can guess what each minifig is thinking….
This model was at BrickFair, but I had a hard time deciding where to put it. I didn’t want to put it on the train layout, since I wanted to show it with the roof and walls removed. There was a “town, non-train” section against the far right wall, but it was full, so I put it on the nearest table to that which was the mosaic table. I also brought it to last Saturday’s BayLUG meeting. But if you missed it, I’m bringing it to BrickCon as well… hope to see you there!
To see all of the pics, click the picture above or click here for a slideshow