Review: New LEGO Technic Idea Books

There’s something new for LEGO Technic fans from No Starch Press.

These books from Yoshihito Isogawa are a great guide to all the wonderful ways you can combine LEGO Technic gears and related elements. I’ve always been a little wary of Technic myself. Even though I got an Expert Builder parts pack as a kid, I never did a lot with it. (I was probably too young, since I was only 6 when that set came out in 1977.) I’ve built a number of modern Technic sets, most recently the Lego Technic Crane Truck 8258, but I’ve only done minimal work with designing my own Technic machinery. Mostly what I’ve done is simple gearing such as my Scrambler amusement park ride, but I always seem to have trouble getting the gears to do quite what I want without either destroying the gears, skipping teeth, or woefully misjudging speed and/or torque.

The first book is The LEGO Technic Idea Book: Simple Machines which shows a myriad of different ways to combine LEGO gears and pulleys to achieve particular gear ratios and directions. If you’ve ever scratched your head wondering how to get a certain speed or torque out of a LEGO motor, your answer is in here. Even the most experienced builders will certainly find something new they can use. For example maybe you know how to get the gear ratio you want, but the mechanism you’re thinking of is too bulky to fit into the model you’re working on. Take a look through this book and there’s a good chance you’ll find a better way to get the same effect in the space that you need to fit it into.

The LEGO Technic Idea Book: Fantastic Contraptions is full of clever ways to combine gears, pulleys, springs, and magnets to create models that move. There are ideas for shooting projectiles, building shock absorbers, and even using magnets to animage LEGO minifig scenes. The only problem is that the magnets shown have been discontinued (due to fears that a child might swallow magnets which would get stuck in their digestive tract and require surgery – for example, the new train sets have a redesigned coupler with a magnet permanently affixed), so that might be frustrating to some people without extensive collections of older parts.

Finally, the The LEGO Technic Idea Book: Wheeled Wonders is full of great ideas for LEGO vehicles. Drivetrains, steering mechanisms, and other vehicular ideas are illustrated in full detail.

The examples in these books are purely pictures. There are no verbal explanations, which you would think would be a problem. But the pictures are reduced to such a level of simplicity that it’s easy to understand the mechanism without any text, and if you build them you could easily understand how they work. There are a lot of tips that show ways of combining gears that I had never thought of, and as I was flipping through it I kept thinking “Oh, that would be good for X” type thoughts. The lack of text would also be helpful for younger kids or people whose primary language is not English (or Japanese, in this case).

I think the one area where this could have been improved would be to show more complex ideas – instead of just showing the simple combinations of parts to achieve a particular kind of connection, show ways to combine these together to create more intricate machines. Some of the examples in the Fantastic Contraptions and Wheeled Wonders books do this to some extent, but I’d prefer to see that taken to a higher level. Also, instead of just showing each model from a variety of angles, I’d like to see step-by-step building instructions or to see some of the simpler modules combined together to create more detailed ones.

One area that isn’t explored very well is motorizing the sets. There are some examples that use motors, but they are largely built using the older 9V motors instead of the current Power Functions parts, and with the Power Functions remote control system, there are a lot of things you could do that aren’t covered by these examples. Hopefully they will come out with a fourth book featuring Power Functions.

All in all though, these are excellent books showing a lot of great ideas for LEGO mechanisms. Even if you’re an experienced builder, there are surely some ideas in here you’ve never seen.

Full Disclosure: The publisher sent me a free review book and sample galley, and the product links in this post are Amazon affiliate links. Besides Amazon, you can get the books from No Starch Press directly or through their distributor O’Reilly.

Scrambler

This amusement park ride is known in various parts of the world as the Scrambler, Twist, Twister, Cyclone, Sizzler, Merry Mixer, Grasscutter, or Cha Cha. In my part of the world (California) I’ve always seen it called the Scrambler. Wikipedia has more information about this ride under its various guises.

Scrambler

I built this model for the 2009 Bay Area Maker Faire where it was a part of BayLUG‘s largest ever public exhibit.

The operating mechanism is similar to the real thing – a central axle drives the whole mechanism, and rubber tires attached to each arm’s driveshaft transfer that motion to the ends of each of the three main arms, where a 90 degree gear causes the 4 cars to spin around.

See all the photos and a video on flickr (slide show).

Amazing Great Ball Contraption video

This is really a work of art – not just for the clever LEGO creations, but maybe even more so for the filmmaking. The modern classical music accompanies the images very well. By taking a series of close-up video shots of various parts of the contraption, each one well composed and from an interesting angle, our interest is maintained throughout. Exceedingly well-done!

Via TechnicBRICKs blog.

LEGO Braiding Machine

Thomas Johnson has done it again. The creator of the LEGO knitting machine has a new masterpiece, a braiding machine built using LEGO Technic pieces which creates a three-stranded braid. You can see photos and a really cool video (nice music, too) of the machine in action.

I’d show you a thumbnail, but the Web site doesn’t seem to make that possible. Anyway, watch the video. It’s mesmerizing.[tags]lego,braider,braiding,machine,technic[/tags]

LEGO Technic Tora no Maki

Yoshihito Isogawa, author of LEGO MINDSTORMS NXT The Orange Book, has just released a new PDF book jam-packed with pictures illustrating a lot of Technic tips and techniques. It’s called LEGO Technic Tora no Maki and although the author and title are Japanese, the book itself consists almost entirely of pictures, so there’s no language or literacy barrier to use. The book is a free PDF download, but the author requests a $10 payment if you use it. I think that’s entirely reasonable, especially with the dollar as weak as it is these days!

I haven’t looked through the whole thing yet, but I glanced at a few pages and think it will be very instructive. I’ve always been pretty weak on Technic skills, so I think I can benefit a lot from this. Check it out!

LEGO Technic Tora no Maki[tags]lego,technic,pdf,book,japanese[/tags]

United Air Lines DC-3

When my father left the Navy and joined United Air Lines in the late 1950’s, he flew this plane, the DC-3.
DC-3

Like my Lunar Mobile Lounge, this has been at several BayLUG meetings, and now I am finally posting about it here.

Also like that model, it is motorized. There are two motors, located in the fuselage: one which powers the propellers and the other which makes the landing gear go up and down. There is a battery box in the fuselage that powers the propellers, and a wire coming out of the entry door leading to a battery box that controls the landing gear. In both cases, a Technic axle passes through the fuselage and the base of each wing. For the props, there are bevel gears in each engine which drive the propshafts. For the landing gear, the axle is mounted directly to the mechanism. A roof panel is removable to view the mechanism inside. Here’s a video I made to illustrate how it works (it’s also available as a QuickTime movie on Brickshelf):

There are other parts that move as well: the ailerons, elevators, and rudder are all freely hinged. Oh, and the wheels rotate :-) The wings and vertical tail can be removed easily for storage and transportation.

The fuselage is designed using half-stud offsets to achieve the desired shape. This means the walls are very fragile as they cannot be properly interconnected.

On the leading edge of each wing are “de-icing boots” which are made of rubber in the real plane. These are modeled using a curved brick that I got at LEGOLAND California in their “build it and buy it” area in 2003. I don’t know if they were ever part of an official LEGO set, but I never saw them anywhere else. It’s the same shape as the trans-light-blue spotlights in the Soccer sets. These “boots” are attached at an angle using plate hinges and plates, and have half-stud offsets to follow the desired wing angle.

Overall this was an interesting experiment in half-stud offsets and integrating a Technic mechanism into a realistic looking model. I learned a lot making this and hope you enjoy it.

Click the photo above to see more, or click to look on Flickr (slideshow) or on Brickshelf.

BayLUG at Maker Faire

Maker Faire BayLUG at Maker Faire sure was a lot of fun! We (Bay Area LEGO Users’ Group) had a great time showing off our LEGO train layout to the public and other Makers at the event.

I uploaded my pictures of the LEGO layout as well as other things from Maker Faire up on my Flickr account.

One of the highlights was when I got interviewed by Blaed Spence about the club on the Yahoo! Answers stage.

I don’t know if it’s going to be an annual event or what, but I sure hope they do another Maker Faire event again soon![tags]lego,makerfaire,baylug,bayltc[/tags]

Scissor Lift in Technic?

Have you ever tried building a scissor lift in [tag]LEGO[/tag]? I’m working on a project that calls for that kind of mechanism to lift it up, like those food service trucks at the airport. It is based on an “X” shaped arrangement, which, like the two parts of a scissors pivot at the middle. By bringing together the two bottom (or top) ends, the top is lifted into the air.

The approach I took was to use [tag]Technic[/tag] worm [tag]gears[/tag] (like a screw) with a rack gear on it. By turning the worm gears the rack gear should move along its length, which moves the two bottom ends together, elevating the top. The problem is that LEGO gears just aren’t up to the load this places on them, and the teeth skip. I motorized it, gearing down the motor to get more torque, but the gears would rather skip than lift the weight.

Has anyone out there successfully built this kind of [tag]scissor lift[/tag] mechanism in LEGO to lift a nontrivial weight? If so please comment below or email me any tips you may have. Thanks!

P.S.: Sorry for the gap in posts – I’ve been sick with a bad cold for a week or so…

Road Bridge

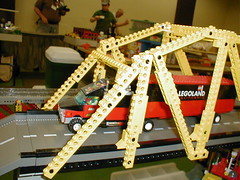
In 2003 (or maybe 2002) I built a bridge for the BayLTC train layout. But it wasn’t a train bridge, it was a road bridge (for cars and trucks).

Road Bridge

The road pieces came from LEGO’s 6600 Highway Construction set, and the bridge’s structural elements were built of Technic bricks.

Most of the angles in the bridge truss design follow some multiple of the 3-4-5 triangle. This is one of the most useful laws of trigonometry: if you have a triangle with sides 3, 4, and 5, or any multiple of that (such as 30, 40, 50) then they will form a perfect right triangle (a triangle where one of the angles is exactly 90 degrees). Why? Because of the Pythagorean Theorem: in any right triangle, the square of the hypotenuse (the side opposite the 90° angle) is always equal to the sum of the squares of the other two sides. And it so happens that 32 + 42 (9 + 16) is equal to 52 (25).

In LEGO, the 3-4-5 triangle is achieved by attaching pieces in distances of 4-5-6 studs. Why? Because of the “fencepost effect” – if you make the connection on the 1st and 4th stud, that’s actually a distance of 3 (since 4-1=3). The same goes for the 4 and 5 unit length sides. In this model, the center trusses are formed by 3-4-5 triangles scaled up by a factor of 6. So the “4” sides (the vertical) are really 24 (actually 25, because of the fencepost effect) tall. The angled trusses are made by sheer guesswork, however. Luckily, there’s enough slop in LEGO connections to make it not really be necessary to always get it just right. When working on this, I built what I called a “Pythagorometer” – a model of the 3-4-5 triangle at various scales – to try to make the angles work out. I’ll post more about that later.

I recently discovered a batch of pictures of this bridge that had never been posted online, taken at the July 2003 GATS layout. You can see them at a Flickr gallery.