
March 17th is St. Patrick’s Day, the day when just about everyone in the U.S. claims to be at least a little bit Irish, which means wearing green clothing and often imbibing copious amounts of beer with green food coloring added, especially when it falls on a weekend. (There’s very little to do with saints involved.) And more to the point, images of leprechauns. Continue reading “Happy St. Patrick’s Day”
Tag: sculpture
Pie for Pi Day
In the American way of writing dates at least, today is 3/14/15 which is of course, Ï€ (pi), that irrational mathematical constant we all love to memorize the digits of (or at least the geekier of us do). In honor of this special day I have created two new models… Continue reading “Pie for Pi Day”
Rainbow Connection
My latest creation is a life size model of Kermit The Frog with his banjo, as seen in the opening scene of the 1979 film The Muppet Movie, when he was playing “Rainbow Connection.” I haven’t done a photo shoot of the model on its own, so for now you will have to be satisfied with pictures from Bricks by the Bay 2012. I will update this post when I have more pictures to add. I was very pleased to have this model voted “Supreme Sculptor” (best sculpture) and “Greenest” (best use of the “Green” theme for the convention).


I built the head first and showed it at the February BayLUG meeting. There was a building contest with a theme of “Movies” based on the fact that the Academy Awards were held near the time of the meeting, and I won the adult competition with the head alone. But for Bricks by the Bay I wanted to at least do a bust if not the whole body. My dream was to have a log made of LEGO bricks for him to sit on, based on the scene in the movie, and I may yet do that….
Kermit’s head started with his eyes. When the new movie The Muppets was in the “coming soon” phase, and I kept seeing ads for it, I started thinking about how a partial Lowell sphere would be a good way to model his eyes, and thought about how a 2×2 round tile can be mounted centered on a 1×4 plate (If you haven’t seen this before, try it! The 2×2 round tile is one of the most versatile pieces LEGO makes.) To make the shape of his head come out right, I had to mount the eyes at an angle, which is done by some interior clips, and then build up LEGO slopes to try to make it fit in as seamlessly as possible. There are even some 1×1 “Henrik” (cheese) slopes that are sandwiched in between parts but not actually attached to anything, just to fill in the gaps!
This part used a huge number of green slopes. I quickly ran out and had to buy more from club members and BrickLink to complete the model. Thanks to Paul Sinasohn, Jayson Cabuag, and Pete Woulfe for helping me to get the parts in a timely manner. I bought parts from Paul at the February BayLUG meeting, and the Monday before the convention, I made a trip up to San Francisco and picked up some more from Pete, and then (after a brief detour to do some dancing at Shades of Blues) took a trip to San Jose to pick up my BrickLink order from Jayson. The lime wedge plates that make up his collar, and more of the green slopes, were mostly from various BrickLink sellers over the course of February and early March, and I choose not to contemplate how much I had to spend to get those…

A week before the convention, all I had was his head and collar. The rest of the body, arms, and legs, were built during those few days before the convention. The body is pretty straightforward construction, but the arms and legs were trickier. I used the Technic click hinge joints to articulate them, and though they aren’t strong enough to hold up the arms and legs in a pose, they do allow the range of movement needed (well almost – his hands don’t quite reach where the strings on the banjo should be). The arms and legs are octagonal in cross-section, but because inverse slopes in green are much less common, I built them by constructing each segment studs-out and then mounting them together back-to-back using various methods. The hands and feet are simple assemblages of green plates. I wish I could have made the fingers articulate but I didn’t have the parts in green to do that.
But by far my favorite part of this model is the banjo, and that was done in a day from parts I had on hand. I made the circle out of 1×2 log bricks interspersed with 1×1 round bricks, with a wall of white 1x bricks to form the face of the banjo. The neck and other details came together out of basic bricks and plates in a straightforward manner. The round part of a banjo is basically a drum, and so there are tightening screws all the way around it to adjust the tension. I simulated those using grey LEGO bars mounted on clip plates, and think it comes off looking quite realistic. I did not string the banjo, because I was afraid I wouldn’t be able to get the strings taut enough to look right. I might see if I can add strings to improve it later though.
I used the head of Kermit as a demonstration model in the SNOT (Studs Not On Top) panel at Bricks by the Bay, and plan to post some more detailed pictures of the construction techniques used in the future, so watch this space.
If you missed Bricks by the Bay, I plan to bring Kermit to the Bricks Cascade convention in Portland in June, so look for him there.
All the photos of Kermit are in the Rainbow Connection photoset on Flickr (click any of the photos in this post, or view as slideshow).
Buzz Lightyear at Hillsdale Mall
On July 23-25, members of BayLUG volunteered to help LEGO Master Builder Steve Gerling and LEGO store employees, and thousands of kids, build an 8-foot tall statue of Buzz Lightyear, from Disney’s Toy Story movies.
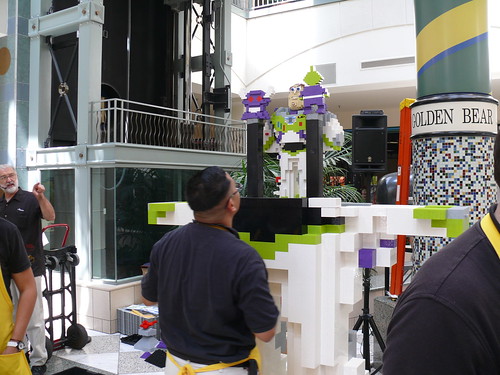
The event was held at the Hillsdale Shopping Center in San Mateo, CA, near the LEGO store. Kids built 8 by 16 stud "bricks" out of 2×4 and 2×8 bricks, which were then assembled into the large model corresponding to the 2×4 bricks in a smaller sample model. BayLUG members volunteered to assist with the project, making sure there were always enough bricks for the kids to build with.
I was there on Saturday all afternoon, and came back Sunday night to help with teardown, but they had already done most of it already by the time I got there, thanks to the help of all the kids. We weren’t paid for our help, but we were given discounts on LEGO which is just as good :-)
Click the image above, or here for a slideshow.
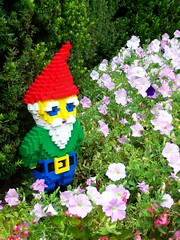
Another 2006 Garden Gnome by another Bill posted by another Ward
In Ted Ward’s pictures from Northwest BrickCon 2006 I came across a picture a while ago of a garden gnome, created by Bill Volbrecht, former LEGO Master Builder.

As far as I know, Ted Ward is no relation to me, and neither is Bill Volbrecht.
As to why this is interesting, I built my own garden gnome in 2006 as well – while I was in Fairfax VA for the Brickfest convention (it wasn’t at the convention; I built it from parts I bought there, in my hotel room afterward). I posted it here shortly after I built it in September 2006. Here’s mine for comparison:
 .
.
As for comparing the two, well I think that he did a better job on the mouth and eyes, but then I was limiting myself (as I’ve done for almost all of my sculptures) to only basic bricks, not plates or slopes or round parts. However if I may be so bold, I like my hat better: it is asymmetrical. I also think the details on the belt are better on mine. But the clincher is that his is functional: I believe that the hands are designed to hold business cards. Mine are hidden behind his back because hands are too hard to model :)
Yoda Build Event at Hillsdale Shopping Center
LEGO has been doing these “Yoda build events” all around the country as promotions for their retail stores. We finally got a chance to participate in one! 
Members of BayLUG spent most of the weekend of July 20 and 21 helping out with this project. A Master Builder from LEGO, Stephen Gerling, was on hand to construct the giant LEGO sculpture of Yoda from Star Wars. It was based on a smaller model built almost entirely out of 2×4 bricks in brown, tan, and sand green colors.
To build the giant sculpture, kids were invited to come and construct giant LEGO bricks. Each brick was 8x16x4, or exactly 4x in each dimension the size of a standard 2×4 brick. Lots of 2×4 and 2×8 bricks in each of the three colors were on hand, and laminated instruction cards were set out for the kids to follow. We ended up with many many bins full of the giant bricks, which were used to construct the Yoda sculpture. In fact we had plenty of bricks left over, so at the end we took the instructions away and just let the kids build whatever they wanted.
The event was a lot of fun. We didn’t get paid, but we got some very special deals on bricks from the store to compensate for our time :-)
Click the big picture to go to the set page on Flickr, or view a slideshow of the photos.
Fish
These two fish 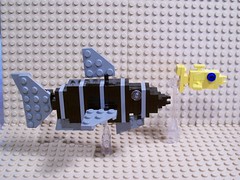 were built as part of a display that my LEGO club, the Bay Area LEGO Users’ Group, maintains at the Stoneridge Mall LEGO store in Pleasanton, CA. On February 20, 2006 we installed an “aquarium” theme there, which lasted for about a month. Read more about the installation and see more pics.
More pictures of the model can be found on Flickr.