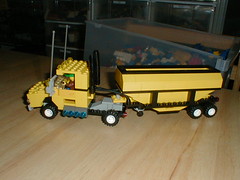
Caltrain F40PH Locomotive

I keep building stuff and using it in BayLTC displays but not posting them online! Here’s another example. This locomotive was built a few years ago, not long after I first got the Super Chief, which sadly has long been discontinued. Like the Super Chief, the top lifts off and it has a control cab with prime mover motor modeled inside. I also added a head-end unit.

Key features I’m particularly proud of are the cockpit windows (mounted on plate hinges) and cooling fans (made from 4×4 turntables, taken apart – the base is mounted on the top of the roof, and the top of the turntable is placed underneath to represent intakes). The nose is also mounted at a difficult angle; this is achieved by a combination of hinge elements.

The color scheme is based on the Caltrain commuter trains which run between San Francisco and San Jose, CA. The exterior detailing is minimal, and not terribly accurate (for one thing, the real thing has red and white stripes on the nose, not yellow and black), but at most of our train shows people have immediately recognized it as a Caltrain so I consider it a success.

View the pictures on Flickr (or view as a slideshow)

LEGO At Work

I brought in some LEGO models to show off in my office at Oracle.Me with LEGO Click the image to view the photoset on Flickr or view a slideshow.

On display is my DC-3 and some office buildings which were featured in the BayLUG "downtown" store window display at the LEGO store recently.

My coworkers have enjoyed the display a lot. All the comments I have had have been positive. I’m surprised to see that most of them think that the models are from kits, rather than my own design, and once I explain that they are generally very impressed.

My plan is to periodically rotate the display, most likely in sync with the BayLUG show schedule. Have you ever brought LEGO to work? What was your coworkers’ reaction?
[tags]lego,office,atwork[/tags]

Trick or Treat

In honor of Hallowe’en I present this vignette.
Trick or Treat

This was actually first mentioned in an earlier blog entry about the October 2006 BayLUG meeting. I entered it into the club building contest which had a theme of “harvest.” Get it? Harvest of souls? I know, it’s macabre and tasteless. Sorry, but my mind just works that way sometimes.

Anyway, it features two kids innocently trick-or-treating. There’s a girl dressed as a doctor and a boy dressed as a policeman. But no medical skills or law enforcement training can stop the Grim Reaper!!

View all the pics by clicking the above image, or click to view the photos on Flickr (slideshow) or on Brickshelf.
[tags]lego,vignette,halloween,death,grimreaper,trickortreat,house[/tags]

United Air Lines DC-3

When my father left the Navy and joined United Air Lines in the late 1950’s, he flew this plane, the DC-3.
DC-3

Like my Lunar Mobile Lounge, this has been at several BayLUG meetings, and now I am finally posting about it here.

Also like that model, it is motorized. There are two motors, located in the fuselage: one which powers the propellers and the other which makes the landing gear go up and down. There is a battery box in the fuselage that powers the propellers, and a wire coming out of the entry door leading to a battery box that controls the landing gear. In both cases, a Technic axle passes through the fuselage and the base of each wing. For the props, there are bevel gears in each engine which drive the propshafts. For the landing gear, the axle is mounted directly to the mechanism. A roof panel is removable to view the mechanism inside. Here’s a video I made to illustrate how it works (it’s also available as a QuickTime movie on Brickshelf):

There are other parts that move as well: the ailerons, elevators, and rudder are all freely hinged. Oh, and the wheels rotate :-) The wings and vertical tail can be removed easily for storage and transportation.

The fuselage is designed using half-stud offsets to achieve the desired shape. This means the walls are very fragile as they cannot be properly interconnected.

On the leading edge of each wing are “de-icing boots” which are made of rubber in the real plane. These are modeled using a curved brick that I got at LEGOLAND California in their “build it and buy it” area in 2003. I don’t know if they were ever part of an official LEGO set, but I never saw them anywhere else. It’s the same shape as the trans-light-blue spotlights in the Soccer sets. These “boots” are attached at an angle using plate hinges and plates, and have half-stud offsets to follow the desired wing angle.

Overall this was an interesting experiment in half-stud offsets and integrating a Technic mechanism into a realistic looking model. I learned a lot making this and hope you enjoy it.

Click the photo above to see more, or click to look on Flickr (slideshow) or on Brickshelf.

Lunar Mobile Lounge

My newest Space creation is the Lunar Mobile Lounge which has actually been at several BayLUG meetings, even though I never posted about it here.Lunar Mobile Lounge

The concept is based on the “mobile lounges” at Dulles (Washington, D.C.) International Airport, which ferry passengers from one terminal to another. However in this case, they ferry people to their waiting spacecraft which landed nearby. Since most spacecraft that people build out of LEGO don’t have wheels, it would be hard for them to dock to the moonbase – it would require some very high-precision flying to land right at a moonbase connector! Therefore I felt there was a need to be able to carry people to and from spacecraft.

Since the spacecraft might have doors that vary in height, I used a scissor lift mechanism to allow this vehicle to raise and lower the passenger compartment – something the Dulles lounges also can do – to match whatever height is needed. You might remember I asked back in March about ways to do this – I ended up using a worm gear to drive, through a short geartrain, a spool that would wind up a string that was attached to the moving leg of the scissor lift.

The vehicle is equipped with an airlock which includes the moonbase connector. The airlock has two doors to the outside – the moonbase connector and a door with stairs leading to the ground (when the vehicle is lowered all the way, that is). There is one interior door, a sliding door which connects the passenger area with the airlock. On the roof you can see the plumbing for the airlock mechanism – hoses and compressors and a big tank for air which are used to alternately drain and fill the air in the airlock and passenger areas. On the underside of the roof are the vents for taking air in and out of these areas.

Click the photo above to see more, or click to look on Flickr (slideshow) or on Brickshelf (pending moderation).[tags]lego,space,moonbase[/tags]

San Ladrillo Suburban Train Station

For the past year or so, the train station on the Bay Area LEGO Train Club layouts at train shows and museums has been my San Ladrillo Suburban Train Station.San Ladrillo Train Station

This is a modern suburban train station, with one platform and two tracks. Passengers boarding trains on the outer track wait on the main platform, and after their train arrives they cross the near track to the yellow boarding platform. Of course, this means no trains can pass through the inner track while this is happening! This is modeled after the way many stations on the Caltrain line are designed (but for safety and scheduling reasons, they are moving to a two-platform design on many of the stations).

The feature which started this model is the tile mosaic floor in the waiting area. I got the idea while riding Caltrain. When we were stopped at the Redwood City station I noticed the pattern in the concrete waiting platform of a grid of squares surrounded by long strips. Theirs wasn’t multicolored, but then theirs wasn’t built from LEGO either. :-) The station building was not based on anything from real life, though. I tried to use an archetypal station design. Note also the ticket vending machines on the station wall – tickets must be purchased before boarding!

Click the photo above to see more, or click to look on Flickr (slideshow) or on Brickshelf (pending moderation).[tags]lego,trains,town,trainstation,sanladrillo[/tags]

Micro Moonbase Monorail

At long last, here is the blog entry about my micro moonbase monorail.Micro Moonbase Monorail Last January, I got together with other members of BayLUG to install a “microscale space” display at the Valley Fair Mall LEGO store. I posted pictures and a description of that on my blog back then, but I always meant to post details about my model that was featured in the display. So here they are, eight months later – sorry!

Here we see two buildings connected by a monorail. At the right is a sort of office building which has an opening for the monorail to enter the building, inspired by the way they do at Disneyland (or is it WDW) where the monorail goes into the hotel (or at least, I think it did when I was a kid – does it still?). At the other end is a standalone station with a micro moonbase connection. In both cases, the monorail fits into the building closely enough that you can imagine it is an airtight connection (something that matters a lot on an airless moon…).

For the track I am using the straight 16-stud long track of the type originally produced for the 4.5V and 12V trains from long ago, but which has lately been available at the LEGO store Pick-A-Brick (in New Grey, natch). I designed a monorail car that fits nicely on the track. The only problem with the design is it would never be able to take any turns, so it’s a good thing I only have straight track of that type! :-)

Click the photo above to see more, or click to look on Flickr (slideshow) or on Brickshelf (pending moderation).

Damaged in Transit

As you may recall, while we were back east for BrickFest I bought a bunch of LEGO and built two new models, the Scarlet Mayhem spaceship and Garden Gnome sculpture.Scarlet Mayhem in PiecesGarden Gnome in PiecesWell it turns out I bought a lot of LEGO. Way too much in fact. So much that I had to buy a 5-piece luggage set (3 suitcases, a handbag, and a toiletries bag) and all 3 suitcases were basically packed full of LEGO.

The current air travel rules allow each person to have up to four bags: two pieces of checked luggage, a carryon, and a “personal item.” With the new bags full of LEGO, Holly and I were right at that limit. And all the bags were packed quite full.

As a result there really wasn’t any way to give my MOC’s adequate padding to keep them from being destroyed. I was able to put them in plastic bags so that the damaged bits would at least stay together. The photos you see here are the result. Although it looks really bad (and in fact, the gnome was even worse – I snapped the picture about halfway through putting him back together), it actually wasn’t very hard to rebuild them by consulting the photos I had taken, so I was able to rebuild both models in fairly short order. I plan to bring them both to the next BayLUG meeting (assuming I don’t go to Northwest BrickCon instead, which is still a possibility).[tags]lego[/tags]

Garden Gnome Sculpture

My first sculpture in over two years is the Garden Gnome.Garden Gnome This enigmatic figure watches over your garden and makes sure everything is in order. Along with Scarlet Mayhem, this was built from my “east coast collection” during my trip for BrickFest. Detailed photos are available on Flickr, or check out the slide show.

I built the gnome using parts from 3 sets of the LEGO Special Edition tub 6092 which I bought at BrickFest. I bought those sets largely for the red tubs, which use the same lids and are exactly 2/3 the height of the blue tubs from the set that got me into LEGO sculpture, 3033, from a few years ago. Ah, I miss that set…

For more of my sculpture work, check the section of this site and the Sculpture collection on Flickr.

This sculpture, like all the ones I did before (except Maneki Neko) is done entirely with regular LEGO bricks. No SNOT, no unusual shapes, not even any plates. (Maneki Neko has plates in the Japanese coin and SNOT in the claws.) Should I go for more detail by using such parts or stick with basic bricks? Let me know (by posting a comment) what you think.

Update: Photos are now also on Brickshelf, and I posted about this on lugnet.build.sculpture.
[tags]lego,sculpture,garden,gnome,gardengnome[/tags]

Scarlet Mayhem

Studless, smooth, and sleek, this racer, known as “Scarlet Mayhem,” was the winner of the first annual Earth to Mars race, which tests a ship’s performance in atmosphere, interplanetary, and reentry situations. Scarlet MayhemThe two-man crew take turns flying the craft, similar to the Le Mans car race. Detailed photos are available on Flickr.

The scoops on the tops of the wings provide air for the engines when running inside the atmosphere in scramjet mode. It has a lot of SNOT details – the bottom of the fuselage is mounted studs-down, and covered in tiles and slopes so that no studs or undersides of bricks are showing. The wings are studs-out, made of bricks, and the only conventional part of the ship is the wingtips which do show their undersides. Because of the studs-down bottom, there are no studs inside on the floor for the minifigs to sit on (to add a studs-up floor would require the roof to be higher, ruining the lines, or removing too much interior space for the minifigs). As a result, the minifigs are sitting on 2×4 plate “sleds” which slide into the ship and sit loosely. The cockpit canopy is hinged on the sides.

This model was built mainly using parts from the Enzo Ferrari 1:17 set, borrowing parts from Prehistoric Power and Speedboat sets. Why such a limited source of parts? I’m on vacation in the east coast away from my LEGO collection, but I bought the above sets at the LEGO store during BrickFest 2006.

It’s a little strange to be building LEGO away from home, and with an unfamiliar and reduced palette. Still, I got a lot of great new parts which I look forward to combining with my collection at home when I return.

Update: I have also posted pictures of this model on Brickshelf.
Update: I also posted about this on Lugnet and Classic-Space.com.[tags]lego,space,snot[/tags]