
Today was the second and final day of the Great Train Expo at the Santa Clara County Fairgrounds.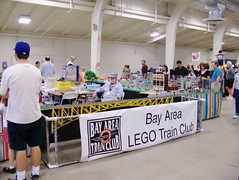 I was there with the Bay Area LEGO Train Club. I had taken some pictures yesterday, but today I was much more prolific and uploaded almost 80 new pictures which I added to the existing photoset. Click the picture or check out the slideshow to see all the pics.
Tag: lego
Great Train Expo San Jose 2008, Day 1
The Bay Area LEGO Train Club is taking part in the Great Train Expo at the Santa Clara County Fairgrounds this weekend, September 27-28.
Sorry about the lighting – I didn’t get around to taking any pictures until after they had shut off the main lights, so I had to use a flash. I plan to take more tomorrow.
We have a 25×25 foot layout with downtown, train yard, farm, and other LEGO models on display. If you have a chance to stop by and see the show, please be sure to say hi. I’m planning to be there all day.
Haunted House at Valley Fair LEGO Store
Every six weeks or so, we (BayLUG) change out our display window at the Valley Fair Mall LEGO store.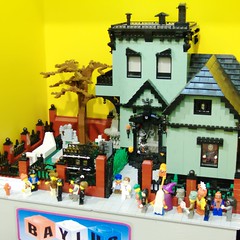 This time, we replaced the Hollywood diorama with a haunted house in honor of Halloween. It will be on display there through November. The entire display is the brainchild of Kenny Paul, a member of BayLUG and designer of excellent houses and other buildings. Check the photos for all the great little details he’s included. My favorite part is the way two of the windows look like angry eyes glaring out at the street. It reminds me of that otherwise forgettable movie Monster House from a few years back. Click the photo to see all the pictures on Flickr or view them as a slideshow.
Land Rover
I just finished building my newest vehicle, a 7-wide Land Rover:
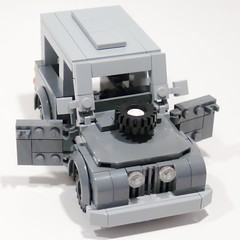
It’s a little bigger than most minifig-scale vehicles, and at 7-wide (really 8 if you include the fenders and bumper) it’s a bit big for standard LEGO roads. But I think it has all the elements that readily identify it as a Land Rover from the 1960’s-70’s era. Hope you like it. Click the picture above for more, or view them as a slideshow.
Brickshelf v Flickr
I’ve been using my Flickr account exclusively for LEGO photos as well as other things, like pictures from Earthquakes soccer games or various scenic shots I may take from time to time. ![]()
 I always tag my LEGO pictures with the lego tag though. I stopped using Brickshelf in 2006 when Kevin Loch suddenly shut it down. At that time I uploaded my back catalog of LEGO photos to Flickr and updated links in all the blog entries… what a chore that was! Then he said it would stay up after all, but I was so miffed I didn’t go back.
But I recently realized that a lot of people are still using Brickshelf. So, I’ve started uploading my pictures there too. I’m working my way backward in time through the blog, uploading all the photos to my Brickshelf account that are only on Flickr. I’m not planning on posting any links to the Brickshelf pics, but in case anyone finds me through that outlet, they’ll not miss what I’ve been doing. I am putting a ‘readme.txt’ in every folder I add, which has links to the corresponding Flickr page and blog entry.
How do you do your image hosting?
Wheeled School Bus
Hot on the heels of my fantastical Lunar School Bus, here’s a much more mundane version.
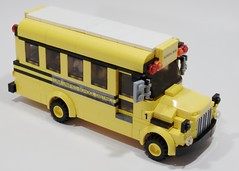
This is the first time I’ve ever encountered a need to specify “wheeled” with reference to a school bus – how about you? :-)
Anyway, it wasn’t that hard. I was thinking of doing it anyway, but when Flickr user Mad physicist asked about it I decided to give it a whirl. I pulled off the antigravity bottom and rocket engines, and otherwise left it intact. The hardest part was the nose, because it contains SNOT sub-units facing in several different directions (up, forward, down, and to both sides), plus half-stud offsets here and there to keep things interesting. However I found a way to reuse as much of the original as possible.
I was also asked if I could make instructions for it. Well, I have done that too. I made a CAD version of the lunar school bus first before I started tearing anything apart (just in case!) and then later adapted it so that you could build either school bus from the same set of sub-units. I have a master MPD file containing everything needed to build both versions, and thanks to the MPD Wizard from Orion Pobursky (see the LUGNET thread where I heard about it for details), I also have separate MPD files containing just what you need to build one or the other. I’m not sure yet how I’m going to publish it – should I charge money or just give it freely? Would people be happy with the MPD file or would they want proper directions?
Anyway, click the pic for the rest of the photos, or view a slideshow. I included some interior shots from the lunar bus in the photoset because the interior is identical.
Lunar School Bus
The other day I was thinking I’d build another hovercar, like my 2059 Cadillac or my remake of Justin’s red aircar.  But as I was sifting through a bin of curved parts, the idea came to me to build a school bus when I saw some yellow Brick 2 x 4 x 1 & 1/3 with Curved Top (6081) parts.
I built it 7-wide (not counting the rocket engines), thanks to an idea I got from Flickr users Lego Monster and Mad physicist since it leaves room for an aisle; see their bus for the inspiration.
I also detailed the interior, with several students in varying degrees of good behavior and a driver inspired by the one from South Park. There are two thugs in the rear who are either conspiring or fighting, maybe both. There’s a boy facing backwards, harassing the girl in the seat behind him. And then in the front there are two reasonably well behaved kids whose hands are raised to report all this bad behavior to the driver. (Well really, their hands are raised because otherwise they wouldn’t fit in their seats)
The bus is a hovercar, using the same kind of smooth underside that I used on the Cadillac and red aircar with the ‘Wedge 4 x 4 x 2/3 Curved’ (45677) and/or ‘Wedge 4 x 6 x 2/3 Curved’ (52031) parts on the underside to represent antigravity units. I also added some 1950’s sci-fi style rocket engines for those longer hops between lunar settlements.
To see more, click the picture above or view the set on Flickr (or as a slideshow).
WALL-E
I’m a little late into the LEGO Wall-E modeling craze, but when I had the idea of using minfig legs for the head, I couldn’t resist. 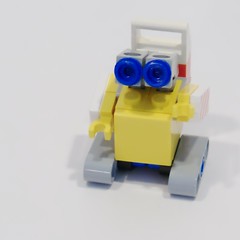 I had the idea when I balanced a minifig on his head on a silicone LEGO coaster and my wife saw it and thought it was WALL-E at first. I thought “Hmm, ya know, those legs do look a little like WALL-E’s eyes….” and went to work.
So this is certainly not the first LEGO version of WALL-E, nor is it the smallest. But I think it’s the only one I’ve ever seen to use minifig legs for a head, and I haven’t seen one that included the cooler that WALL-E used to collect knickknacks.
Click the image for the rest of the pictures, including a disassembled view that shows how it went together. Or try the slideshow.
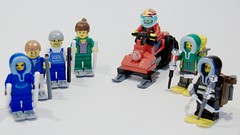
Snow Sports Minifigs
Sushi Bar
My latest building is a sushi bar. It is part vignette and part town building.
I built the interior first, starting with a bare baseplate. Only when that was completely finished, I built a basic box for walls with windows and a door in front, and a back door in the rear. The box lifts off easily; the perimeter of the baseplate is tiled, with only one stud on each side (a jumper plate) holding the walls in place.
On top of the walls there is a simple roof, with 6×8 slopes for an overhang and homemade signs, made with my trusty P-touch label maker. (The name of the restaurant is Hoshi Sushi; hoshi means “star” which is because I found that my label maker could make stars….)
The restaurant is staffed by two people: a sushi chef and a waitress. Both are rather overworked, as it is a prosperous enterprise. It was inspired by and loosely based on my favorite local sushi place, Masa’s Sushi in Mountain View, CA.
Some things to look for:
- Chopsticks made from (Minifig Feathers with Pin)
 stolen off the roof of my 10185 Green Grocer set. See them clearly here.
 - The overpreponderance of maguro nigiri (tuna over rice) on people’s plates. This is because the only transparent color I have in 1×1 tiles that looks at all like raw fish is trans-red. I wish I had some trans-orange 1×1’s so I could have sake nigiri (salmon) but alas, no. I have some 1×2’s in trans-orange in the sushi bar waiting to be cut, however. I also have some people eating (non-trans) brown, which I decided is unagi nigiri (eel). None of the other 1×1 tile colors looked at all appetizing, and I couldn’t figure out a way to make maki (rolled) sushi at all at this scale…
- Soy sauce bottles – some are full, others are empty. (I ran out of trans-smoke cones)
- The slightly-too-big-for-minifig-scale maneki neko (beckoning cat) which sits in the back left corner (the prosperity corner, according to Feng Shui traditions) to attract money. Masa’s has a maneki neko in that spot too, but instead of a gold coin, it’s holding a bottle of Asahi beer. I guess Masa wants to invite more beer into his life :)
- See if you can guess what each minifig is thinking….
This model was at BrickFair, but I had a hard time deciding where to put it. I didn’t want to put it on the train layout, since I wanted to show it with the roof and walls removed. There was a “town, non-train” section against the far right wall, but it was full, so I put it on the nearest table to that which was the mosaic table. I also brought it to last Saturday’s BayLUG meeting. But if you missed it, I’m bringing it to BrickCon as well… hope to see you there!
To see all of the pics, click the picture above or click here for a slideshow