Advent Calendars, Day 4

Now we come to the real drama. Each calendar introduces a nemesis for our heroes! On the Castle side, we get a demented skeleton wielding a flail (mace and chain); whereas on the City side, we get a girl with ice cream.

Advent 4

Why do I say the fair maiden is a nemesis? Remember that I decided City guy was the Evil Twin, and if she’s pure and innocent and good, then she’s his nemesis of course! Anyway, here’s all the stuff we have so far:

Advent 1-4

Advent Calendars, Day 3

Since I waited until almost midnight “yesterday” (half an hour ago) to post, I thought I’d get a head start on day 3. Hope you have opened yours before reading this!!

Anyway, Day 3 brings furniture and utensils for Evil Twin’s Thanksgiving feast. But it’s a small table for one, a frying pan, and a mug. Clearly the intent is he’s only cooking for himself. I guess that does make him pretty Evil. And doing it right next to his Good Twin, who’s hard at work guarding that arch thingy, is doubly cruel. You know the tourists who taunt the guards at Buckingham Palace, who famously have to just stand there and not make any reaction at all? I imagine it’s kind of like that. Good Twin has to stand there and smell the mouth watering-aroma of plastic turkey leg cooking on the open fire, without being able to make a move, even to wipe the drool off his chin.

Advent 3

At least Good Twin gets some new armor and a sword to fight off the bad guys, while his lazy good-for-nothing twin stands there cooking food for himself. Here he is, trying it on:

Trying on the armor

He’s lucky to get it on day 3. In WoW, a paladin can’t get armor like that until level 40 or so….

Advent Calendars, Day 2

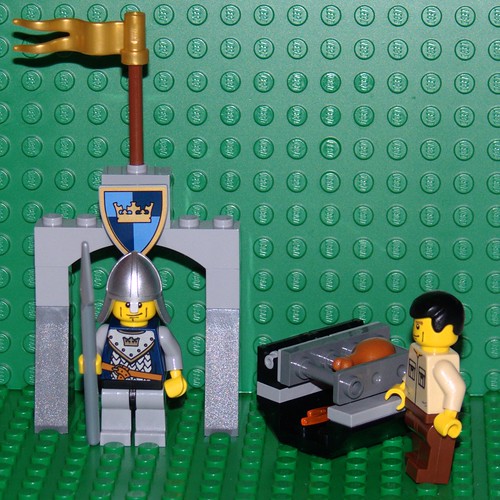
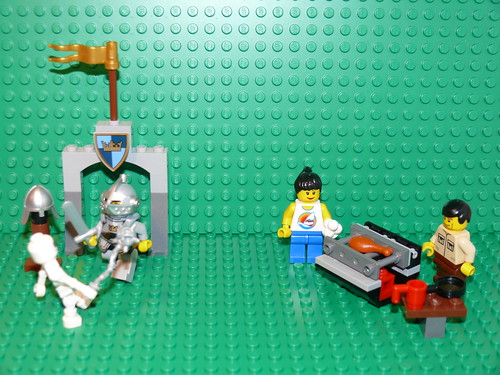
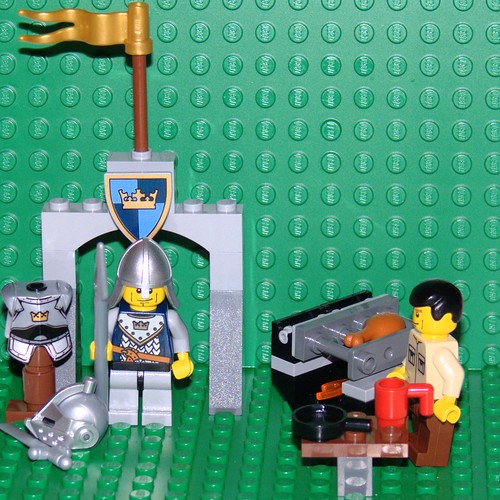
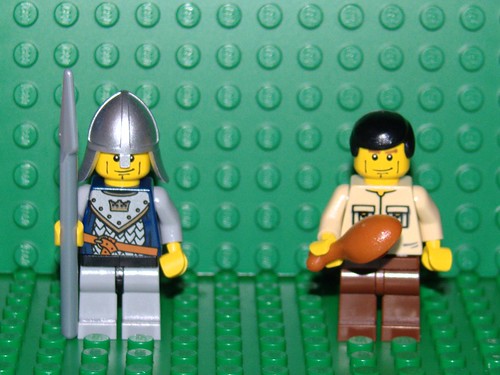
Behind Door #2 of the Town Advent calendar, we find a grille, presumably for Evil Twin to reheat that leftover Thanksgiving turkey leg. Not sure why they didn’t just use a microwave oven though. On the Castle side, we get a little arch and flag so the Good Twin has something to guard.

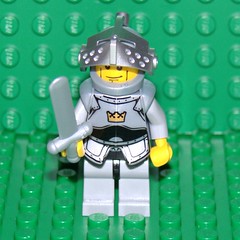
Oh wait, it must be a flashback to before Thanksgiving! Evil Twin is cooking dinner – this must be before he went bad – and Good Twin is hard at work guarding the arch thingy. Ah, innocence.

Advent 2

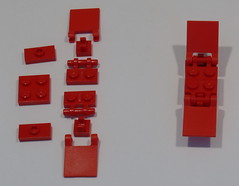
But all is not well in Advent land. The instructions for the town set clearly indicate that there should be a 1×4 grey plate under the hinges.

Town Instructions

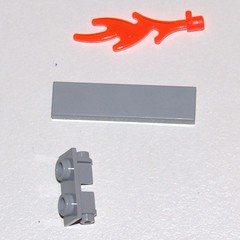
However, I didn’t get one! They gave me an extra 1×4 tile instead. That’s OK, because I could use those more in my collection anyway. But for a little kid this would be horrible – they wouldn’t be able to build what’s in the picture! Or if they did, it wouldn’t stay on; it would slide off at the slightest nudge. And little kids are very prone to nudging things, as everyone knows. Here are the parts I got behind Door #2:

Town Parts

So, after adding a 1×4 grey plate from my collection, I was left with a few pieces left over. It’s common for LEGO to give you extras of some small, easily lost parts, like the flame or a 1×1 round plate, but a hinge top?? That’s a weird one.

Town Extra Parts

I’m wondering if it’s just me or if everyone had the same problem? I should confess something at this point… when I went to BrickCon in Seattle, I bought an advent calendar at the LEGO store at a discount, and when I realized I couldn’t afford the baggage space to bring the box home, I had to cheat and open it at my hotel. I’m 99.7% sure that I didn’t have this problem then – I think I’d remember if I did.

Wow, just a few minutes before midnight – not off to an auspicious start. I’d better do Day 3 right after midnight to make up for it…

Advent Calendars, Day 1

Thanks to LEGO for relenting and letting us have the Castle advent calendar here in the U.S.! Having both that and the City set, I thought I’d shamelessly rip off the Reasonably Clever annual tradition of having fun with the advent calendars. Each day I’ll be presenting what I find behind the respective door of each.

Advent Calendars

SPOILER ALERT: Don’t visit this blog until you’ve opened the day’s gift from your Advent Calendar(s) or you may find out too soon what it is! This is your first and final warning!!

However, while I am a little clever, I don’t think I’m quite up to the standard set by “Reasonably” so I’ll just blog about each day’s entry without trying to make a game of it. If you want more cleverness than that, go see what they’re doing over at Advent Wars – for example, you can see what it looks like to open the Advent Calendar boxes for day 1. Plus, the Reasonably Clever comic, BRiCK House, will probably be invaded by Advent madness. It’s all fun and I don’t know where they get the free time for all that cleverness.

Anyway, here’s what I found behind Door Number One on each calendar:

Twins

If you look carefully you’ll see it’s the same face in each one! I guess they’re twins.

CITY: Guy with some of the Thanksgiving leftovers (Evil Twin)
CASTLE: Guy guarding the rest of the Thanksgiving leftovers (Good Twin)

P.S.: Yes, I really am waiting until each day comes around to open that day’s box. So if I am ever late with an entry, hopefully you’ll be understanding.

Land Rover

I just finished building my newest vehicle, a 7-wide Land Rover:

Land Rover

It’s a little bigger than most minifig-scale vehicles, and at 7-wide (really 8 if you include the fenders and bumper) it’s a bit big for standard LEGO roads. But I think it has all the elements that readily identify it as a Land Rover from the 1960’s-70’s era. Hope you like it. Click the picture above for more, or view them as a slideshow.

Wheeled School Bus

Hot on the heels of my fantastical Lunar School Bus, here’s a much more mundane version.

Wheeled School Bus

This is the first time I’ve ever encountered a need to specify “wheeled” with reference to a school bus – how about you? :-)

Anyway, it wasn’t that hard. I was thinking of doing it anyway, but when Flickr user Mad physicist asked about it I decided to give it a whirl. I pulled off the antigravity bottom and rocket engines, and otherwise left it intact. The hardest part was the nose, because it contains SNOT sub-units facing in several different directions (up, forward, down, and to both sides), plus half-stud offsets here and there to keep things interesting. However I found a way to reuse as much of the original as possible.

I was also asked if I could make instructions for it. Well, I have done that too. I made a CAD version of the lunar school bus first before I started tearing anything apart (just in case!) and then later adapted it so that you could build either school bus from the same set of sub-units. I have a master MPD file containing everything needed to build both versions, and thanks to the MPD Wizard from Orion Pobursky (see the LUGNET thread where I heard about it for details), I also have separate MPD files containing just what you need to build one or the other. I’m not sure yet how I’m going to publish it – should I charge money or just give it freely? Would people be happy with the MPD file or would they want proper directions?

Anyway, click the pic for the rest of the photos, or view a slideshow. I included some interior shots from the lunar bus in the photoset because the interior is identical.

Sushi Bar

My latest building is a sushi bar.Sushi Bar It is part vignette and part town building.

I built the interior first, starting with a bare baseplate. Only when that was completely finished, I built a basic box for walls with windows and a door in front, and a back door in the rear. The box lifts off easily; the perimeter of the baseplate is tiled, with only one stud on each side (a jumper plate) holding the walls in place.

On top of the walls there is a simple roof, with 6×8 slopes for an overhang and homemade signs, made with my trusty P-touch label maker. (The name of the restaurant is Hoshi Sushi; hoshi means “star” which is because I found that my label maker could make stars….)

The restaurant is staffed by two people: a sushi chef and a waitress. Both are rather overworked, as it is a prosperous enterprise. It was inspired by and loosely based on my favorite local sushi place, Masa’s Sushi in Mountain View, CA.

Some things to look for:

  • Chopsticks made from (Minifig Feathers with Pin)472 Minifig Feathers with Pin stolen off the roof of my 10185 Green Grocer set. See them clearly here.
  • The overpreponderance of maguro nigiri (tuna over rice) on people’s plates. This is because the only transparent color I have in 1×1 tiles that looks at all like raw fish is trans-red. I wish I had some trans-orange 1×1’s so I could have sake nigiri (salmon) but alas, no. I have some 1×2’s in trans-orange in the sushi bar waiting to be cut, however. I also have some people eating (non-trans) brown, which I decided is unagi nigiri (eel). None of the other 1×1 tile colors looked at all appetizing, and I couldn’t figure out a way to make maki (rolled) sushi at all at this scale…
  • Soy sauce bottles – some are full, others are empty. (I ran out of trans-smoke cones)
  • The slightly-too-big-for-minifig-scale maneki neko (beckoning cat) which sits in the back left corner (the prosperity corner, according to Feng Shui traditions) to attract money. Masa’s has a maneki neko in that spot too, but instead of a gold coin, it’s holding a bottle of Asahi beer. I guess Masa wants to invite more beer into his life :)
  • See if you can guess what each minifig is thinking….

This model was at BrickFair, but I had a hard time deciding where to put it. I didn’t want to put it on the train layout, since I wanted to show it with the roof and walls removed. There was a “town, non-train” section against the far right wall, but it was full, so I put it on the nearest table to that which was the mosaic table. I also brought it to last Saturday’s BayLUG meeting. But if you missed it, I’m bringing it to BrickCon as well… hope to see you there!

To see all of the pics, click the picture above or click here for a slideshow

Classic Space NASCAR

Inspired by the NASCAR fad that’s been going around the Flickr LEGO community, I built this using the layout photo from mikepsiaki. However I thought I’d do one with the Classic Space esthetic….

Classic Space NASCAR

The car is identical to Mike’s design, with a couple of changes:
Driver

  • To get the Classic Space logo on the sides, I had to replace the 1×2 panels with 1×2 bricks. That meant the 1×1 brick with studs on two sides would no longer fit, so I substituted 1×1 Technic bricks with half-pins instead.
  • Mike didn’t have anything between the rear wheels and the car body above. You could see clear through the car above the rear tires, and the car was very fragile. But the space was perfect for a 2×4 brick! Perhaps Mike uses that in his real model but just didn’t show it in the instructions layout image?
  • Since this is Classic Space, I used the old style 1×1 plate with clip :)
  • There’s a red Classic Space minifig inside!

Of course, I really wanted a big Classic Space logo on the hood. I have a few of the 3×6 slopes that would have fit but it would’ve ruined the lines of the car, so I elected to stick with the original parts and just put Classic Space printed bricks wherever I could fit them. I used a dark blue windscreen; I don’t think they were ever made in yellow, so this is more like the 6890 Atomic Cruiser set than the 497 Galaxy Explorer esthetic that people tend to associate with Classic Space. But that Atomic Cruiser was probably as big of an influence on me as a kid as the Galaxy Explorer anyway.

Check out the LAML Radio interview with Mike Psiaki to learn more about the NASCAR fad, or just to find out how to pronounce his last name… :)

Blackburn Hotel at Valley Fair Mall

From May 31 to July 5, my Blackburn Hotel (Version 2) was on display at the LEGO Store at Valley Fair Mall in Santa Clara, CA in the BayLUG window.

Front View

This is a redesigned, bigger model of the mythical Blackburn Hotel that I originally built for the Bay Area LEGO Train Club layout. I haven’t done a proper photo-shoot of the hotel itself, but you can see pictures of it in a Flickr set I created to collect all the images of it, including the ones from this store display.

For the store display, however, I had to customize it a bit. I left off the rooftop sign, and modified the baseplates. The version that was used in BayLTC train shows used regular road plates for the street, rather than the tiled half-road (16-stud-wide baseplates) seen in the store display. Also, because the left side of the hotel was located on a street corner, the model didn’t include the road there, while on the right side there was an 8-stud half-alley. When we installed the hotel at the store, that caused the sign to be pressed against the background side wall, and the right side to have a strange gap. So, we ripped the baseplates off the bottom of the hotel and moved everything over by eight studs, putting in a partial road on the left side. Thanks to Russell and Bruce for their help reconfiguring the baseplates.

Click the big picture to go to the set page on Flickr, or you can view a slideshow of the photos.