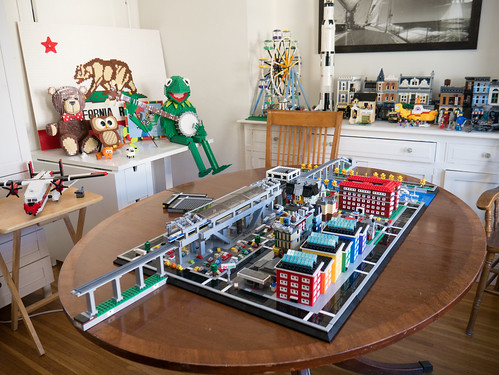
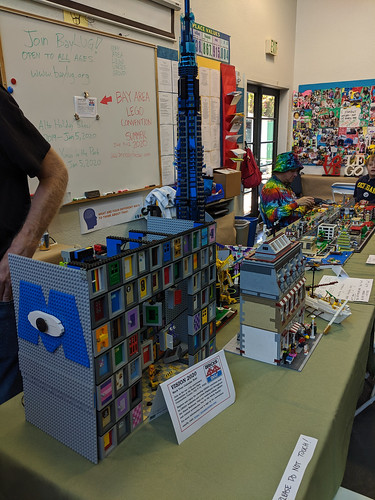
Archive for the ‘My Models’ Category

Train Semaphore Signal

Wednesday, December 10th, 2008

This has been a feature of many BayLTC train layouts over the past few years.

SemaphoreSemaphore, rear close-up

This is an old-fashioned train signal, or "semaphore," which uses lights for nighttime use and an arm at various angles for daytime use. Signals like these were widely used on railroads all over the world in the early days, but particularly in North America they have been phased out and replaced with light signals. Now you mostly see them on tourist railroads or in train museums. Here is an example (from the Wikipedia Railway semaphore signal article) of an Australian version of this:

Wikipedia semaphore image

Update: I make no claim of accuracy for any particular railroad. In my research online I found many different systems for semaphore signals, both “upper quadrant” (such as this model) and “lower quadrant.” Different colors and designs were used on different railroads, and across different countries. There was probably some railroad somewhere that used a signal like mine, but I couldn’t tell you which one. Here’s another article about early railroad signaling if you are interested in reading more.

Isuzu NPR Delivery Truck

Thursday, December 4th, 2008

My latest model is one of the most common trucks in the world today, the Isuzu NPR.

Isuzu NPR Delivery Truck

This one is configured as a delivery van, with roll-up door in the rear. Notable details include the cab with sloped windshield, fuel tank, sloped driveshaft, mud flaps, and 6 wheels.

I originally had the idea for this at one of the BayLUG meetings in conversation with another member, Brooks. He and I experimented with the geometry to see if the windshield design was doable at that meeting, and after many iterations this is what I ended up with.

Land Rover

Sunday, September 21st, 2008

I just finished building my newest vehicle, a 7-wide Land Rover:

Land Rover

It’s a little bigger than most minifig-scale vehicles, and at 7-wide (really 8 if you include the fenders and bumper) it’s a bit big for standard LEGO roads. But I think it has all the elements that readily identify it as a Land Rover from the 1960′s-70′s era. Hope you like it. Click the picture above for more, or view them as a slideshow.

Wheeled School Bus

Sunday, September 14th, 2008

Hot on the heels of my fantastical Lunar School Bus, here’s a much more mundane version.

Wheeled School Bus

This is the first time I’ve ever encountered a need to specify “wheeled” with reference to a school bus – how about you? :-)

Anyway, it wasn’t that hard. I was thinking of doing it anyway, but when Flickr user Mad physicist asked about it I decided to give it a whirl. I pulled off the antigravity bottom and rocket engines, and otherwise left it intact. The hardest part was the nose, because it contains SNOT sub-units facing in several different directions (up, forward, down, and to both sides), plus half-stud offsets here and there to keep things interesting. However I found a way to reuse as much of the original as possible.

I was also asked if I could make instructions for it. Well, I have done that too. I made a CAD version of the lunar school bus first before I started tearing anything apart (just in case!) and then later adapted it so that you could build either school bus from the same set of sub-units. I have a master MPD file containing everything needed to build both versions, and thanks to the MPD Wizard from Orion Pobursky (see the LUGNET thread where I heard about it for details), I also have separate MPD files containing just what you need to build one or the other. I’m not sure yet how I’m going to publish it – should I charge money or just give it freely? Would people be happy with the MPD file or would they want proper directions?

Anyway, click the pic for the rest of the photos, or view a slideshow. I included some interior shots from the lunar bus in the photoset because the interior is identical.

Lunar School Bus

Saturday, September 13th, 2008

The other day I was thinking I’d build another hovercar, like my 2059 Cadillac or my remake of Justin’s red aircar. Lunar School Bus But as I was sifting through a bin of curved parts, the idea came to me to build a school bus when I saw some yellow Brick 2 x 4 x 1 & 1/3 with Curved Top (6081) parts.

I built it 7-wide (not counting the rocket engines), thanks to an idea I got from Flickr users Lego Monster and Mad physicist since it leaves room for an aisle; see their bus for the inspiration.

I also detailed the interior, with several students in varying degrees of good behavior and a driver inspired by the one from South Park. There are two thugs in the rear who are either conspiring or fighting, maybe both. There’s a boy facing backwards, harassing the girl in the seat behind him. And then in the front there are two reasonably well behaved kids whose hands are raised to report all this bad behavior to the driver. (Well really, their hands are raised because otherwise they wouldn’t fit in their seats)

The bus is a hovercar, using the same kind of smooth underside that I used on the Cadillac and red aircar with the ‘Wedge 4 x 4 x 2/3 Curved’ (45677) and/or ‘Wedge 4 x 6 x 2/3 Curved’ (52031) parts on the underside to represent antigravity units. I also added some 1950′s sci-fi style rocket engines for those longer hops between lunar settlements.

To see more, click the picture above or view the set on Flickr (or as a slideshow).

WALL-E

Friday, September 12th, 2008

I’m a little late into the LEGO Wall-E modeling craze, but when I had the idea of using minfig legs for the head, I couldn’t resist. WALL-E I had the idea when I balanced a minifig on his head on a silicone LEGO coaster and my wife saw it and thought it was WALL-E at first. I thought “Hmm, ya know, those legs do look a little like WALL-E’s eyes….” and went to work.

So this is certainly not the first LEGO version of WALL-E, nor is it the smallest. But I think it’s the only one I’ve ever seen to use minifig legs for a head, and I haven’t seen one that included the cooler that WALL-E used to collect knickknacks.

Click the image for the rest of the pictures, including a disassembled view that shows how it went together. Or try the slideshow.

Snow Sports Minifigs

Thursday, September 11th, 2008

These minifigs were a part of BayLUG‘s store display at the Hillsdale Mall this summer.

Snow Sports Minifigs

Included are four skiers, two snowshoers, and a snowmobiler. This was my first attempt at a snowmobile and I’m pretty happy with it… To see the pics, click the picture above or see the slideshow.

Sushi Bar

Wednesday, September 10th, 2008

My latest building is a sushi bar.Sushi Bar It is part vignette and part town building.

I built the interior first, starting with a bare baseplate. Only when that was completely finished, I built a basic box for walls with windows and a door in front, and a back door in the rear. The box lifts off easily; the perimeter of the baseplate is tiled, with only one stud on each side (a jumper plate) holding the walls in place.

On top of the walls there is a simple roof, with 6×8 slopes for an overhang and homemade signs, made with my trusty P-touch label maker. (The name of the restaurant is Hoshi Sushi; hoshi means “star” which is because I found that my label maker could make stars….)

The restaurant is staffed by two people: a sushi chef and a waitress. Both are rather overworked, as it is a prosperous enterprise. It was inspired by and loosely based on my favorite local sushi place, Masa’s Sushi in Mountain View, CA.

Some things to look for:

  • Chopsticks made from (Minifig Feathers with Pin)472 Minifig Feathers with Pin stolen off the roof of my 10185 Green Grocer set. See them clearly here.
  • The overpreponderance of maguro nigiri (tuna over rice) on people’s plates. This is because the only transparent color I have in 1×1 tiles that looks at all like raw fish is trans-red. I wish I had some trans-orange 1×1′s so I could have sake nigiri (salmon) but alas, no. I have some 1×2′s in trans-orange in the sushi bar waiting to be cut, however. I also have some people eating (non-trans) brown, which I decided is unagi nigiri (eel). None of the other 1×1 tile colors looked at all appetizing, and I couldn’t figure out a way to make maki (rolled) sushi at all at this scale…
  • Soy sauce bottles – some are full, others are empty. (I ran out of trans-smoke cones)
  • The slightly-too-big-for-minifig-scale maneki neko (beckoning cat) which sits in the back left corner (the prosperity corner, according to Feng Shui traditions) to attract money. Masa’s has a maneki neko in that spot too, but instead of a gold coin, it’s holding a bottle of Asahi beer. I guess Masa wants to invite more beer into his life :)
  • See if you can guess what each minifig is thinking….

This model was at BrickFair, but I had a hard time deciding where to put it. I didn’t want to put it on the train layout, since I wanted to show it with the roof and walls removed. There was a “town, non-train” section against the far right wall, but it was full, so I put it on the nearest table to that which was the mosaic table. I also brought it to last Saturday’s BayLUG meeting. But if you missed it, I’m bringing it to BrickCon as well… hope to see you there!

To see all of the pics, click the picture above or click here for a slideshow

Caltrain F40PH v2

Tuesday, September 9th, 2008

This is my second attempt at modeling a Caltrain diesel locmotive, as seen running commuter trains between San José and San Francisco, CA.Caltrain F40PH v2 Years ago, I built a model of the Caltrain F40PH locomotive. The trickiest part of this engine to model is the nose, which has a “V” shape and also slopes back. In the earlier version, I mounted tiles at a complex compound angle, but was never entirely happy with that. The relatively new 1×1 “cheese” slope piece offers new opportunities for ways to achieve angles like this. But in order to get a smooth slope, I had to use half-plate offsets. I’m pretty happy with the result.

It is an EMD F40PH, similar to the ones Amtrak used to use for all their long haul trains, used by VIA Rail in Canada, and widely used in commuter lines around the USA and Canada.

This model made its debut at BrickFair, but I couldn’t post about it here since I only finished building it the night before I flew to DC for the convention. I also brought it to this past weekend’s BayLUG meeting in San Leandro.

Other notable features are the windscreens, which are made from 1×2 panels mounted on jumper plates and turned at a slight angle, half-plate inset panels on the sides, and another half-plate offset on the rear door. I’m planning to give a talk on half-plate offsets at BrickCon next month in Seattle. Like the previous version I used 4×4 old style turntables for the roof fans, but in this version there is a Technic gear representing the fan blades. I thought about motorizing them, but haven’t tried it yet.

Justin’s Aircar Reimagined

Sunday, September 7th, 2008

At a recent BayLUG Space meeting, Justin brought a red aircar that he had built several years before.Justin's Aircar Reimagined At the meeting, several of us were discussing how newer parts could be used to make it better. It started with the windscreen; several of us suggested replacing the one Justin used with the new curved windscreen seen in the Agents and Speed Racer sets. Then I started thinking about the various angled pieces Justin used, and how those could be replaced with curved pieces that are now available from LEGO, and asked Justin if he would mind if I made my own aircar based on his.

After that meeting, I built an exact copy of Justin’s design based on pictures I took there, and then started thinking about how to update it. I included a few features that I thought were essential to his:

  • Suicide doors built using 1x2x2 panels, with a corner plate to form a rear-view mirror. But I added a cheese slope to it for streamlining (and studlessness).
  • Front grill using a grill tile mounted on a 1×2 plate with 2 finger hinge
  • Minfig seats used as air scoops
  • Overall shape and color scheme, including ridges on the front “grill” which Justin made using 1×3 33 degree slopes, but on mine are 1×3 curved slopes.

I also redesigned the underside and rear, which I felt could use more detail. I built the underside studs-down and studless, similar to how I did the 2059 Cadillac aircar.

Click the thumbnail for more pictures or view a slideshow.